

The invitations….that first tentative step into the deep-end of wedding planning, often happens before you know exactly what your (fully fabulous) Big Day vision looks like. Which, of course, makes picking the ‘right’ invitation even trickier!
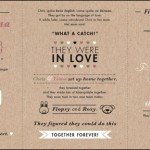
SAVE THE DATES SAVED THE DAY!
We had the added stress of getting our invites out ASAP, as many of our guests needed to book flights, and organise annual leave. This is where the American tradition of a ‘Save the Date’ came in handy. With our date and venue set, and and inspired by the fact that most of our guests would be travelling from London to SA, we decided to base our Save the Dates on that London Underground staple – the Oyster card.
We tweaked the design (with apologies to TFL) and printed them straight onto magnetic paper (no really, it is a real thing – look here) at home on our shke-donky old inkjet printer, and mailed them out with the Christmas cards. This not only gave our cross-continental guests no excuse not to come, but also gave us breathing space to send out the invites closer to the day, once we had some idea of styles and themes.

THE COURSE OF TRUE LOVE… NEVER DID RUN SMOOTH
When it came to our invites, we looked at a lot of options – the vintage printed hankies, the gorgeous letterpress variants, the beautiful story-telling ones, which charted how a couple met – I googled them all, and sadly dismissed them as either too complicated or way out of our budget.
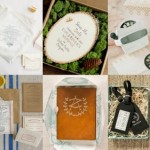
I’m a sucker for old maps and vintage signage and one day, whilst doodling during a meeting, hit on the idea that our 10 year long relationship was kind of like a complex tube journey – with stops, starts, separate paths, connected junctions and a newly added bit that was still ‘under construction’…. and, so the tube map invite was born. Luckily, a very patient and talented friend helped us design the map itself, which we had printed onto Kraft paper, along with the map to the venue and an itinerary for guests who were staying the weekend.
To house all our ‘bits’ we used these handy printed map placemats (though, an old map book or ordnance map from Oxfam would work just as well, if not better). See the how-to below for full folding instructions. What I like about this paper DIY idea is that it’s a lovely way to add a personal touch to simple, printed invites, without blowing the budget. A really sweet way of making it personal, is to select a map with special significance to you as a couple – where you met, or where he proposed, or where your venue will be.
SUPPLIES
• An old map book or printed wrapping paper cut to A3 (29 x 42 cm) size
• Scissors
• Tape or glue
• Photo corners or mounting squares
• Ribbon or string (optional)
HOW TO

Step 1: Fold the right hand side edge over into a ‘hem’ (about 2 cm) to neaten it off. (Don’t worry, this gets hidden by other folds).

Steps 2 & 3: Fold the sheet lengthways, into thirds (so the edges meet in the middle).

Step 4: Starting from the ‘hemmed’ edge, fold the sleeve over by 11.5cm, then fold it over again. This should leave you with 3 sections of equal size, and an extra ‘flap’ on the left hand side.
Step 5: To create the outer flap fold the 2 edges of the left hand side inwards, creating triangular shaped pockets.

Step 6: Finish off the edge by folding it over and taping or gluing it down.To help flatten the envelope, and keep your folds crisp, use a lightweight cloth and iron the final piece on low heat.

Now, you can mount your invitation printables using photo corners, or tie them into position using string, or even, hold them in place using paper clips. Once complete, fold it closed and keep it all together using a strip of paper or a simple ribbon wrap. The final result should slide easily into standard C6 envelopes.

Handy hint: Not keen on a map theme? Use printed wrapping paper or wallpaper that matches your colour scheme instead!
PLANNING TO DIY YOUR INVITES?
Make a template
Experiment and complete one or two samples before you invest in all your supplies. This allows you to iron out any ‘bugs’, before you spend too much on an idea that may not work out how you envisioned it.
Buy in bulk
You’ll need a lot of paper supplies – try to find these online, or somewhere you can buy a few packs rather than speciality art/stationery stores, which may charge you per sheet.
Know your GSM (Grams per Square Metre)
Check the paper you are getting isn’t too flimsy, but is also thin enough to fit through a standard printer. (I’d aim for about 90–180 gsm, especially if you’re layering or folding it).
Multiply by a hundred
Remember that however complex one invite is, you will have to repeat all those bits a hundred or more times, depending on the length of your guest list. Be prepared for ‘stamp cramp’!


Comments are closed.